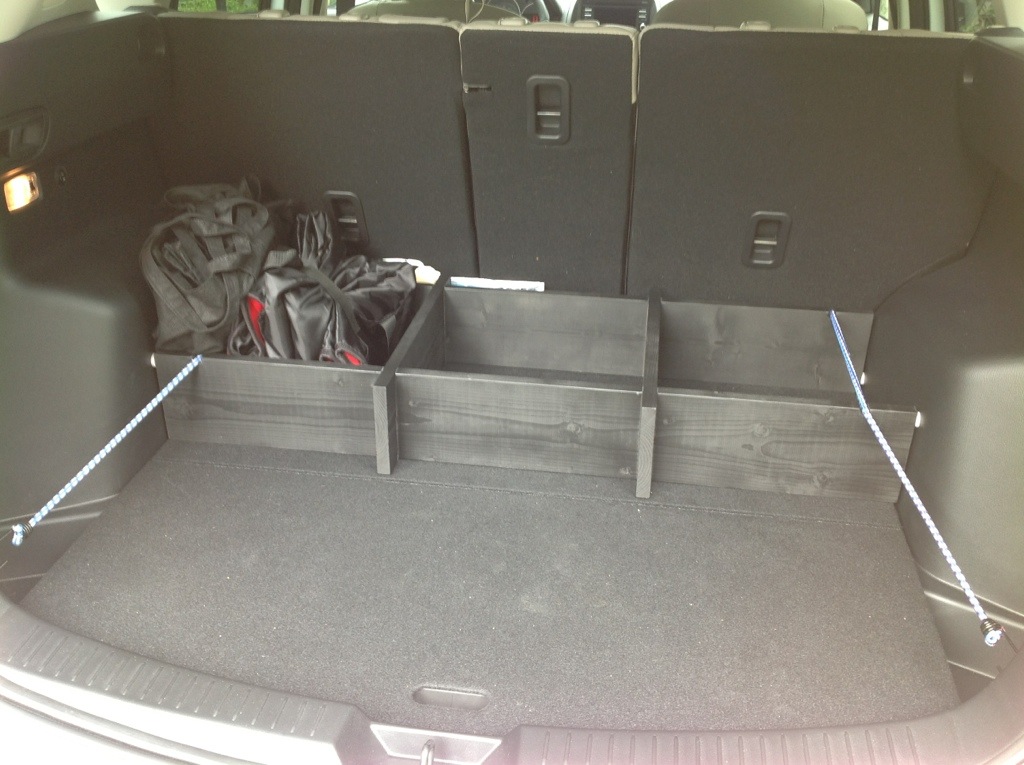
We got a Mazda CX-5 and so far we’re pretty happy with it. We wanted an organizer in the back, though, to help prevent things from falling over and rolling around, and we wanted it to be easy to collapse if necessary. Here’s how we made one for less than $15. Add a few extra dollars for bungee cords to hold the organizer in place if you want. (Mazda recommends that you secure the stuff you put in the back.)
The bins were designed to accommodate our reusable grocery bags, with some tight nooks in the back for things like baseballs, pencil kits, and books. (The kids can open up the middle section and reach back.) Placed close to the back seats, this design still allows access to things stored with the spare tire. It can be disassembled pretty quickly if necessary.
Supplies:
- 1 piece of 1x6x10′ pine (whiteboard) lumber, and be sure it’s not splitting at the ends. This should cost about $10 at the home center — ask them to cut it in half for you and you’ll be able to fit it into the CX-5.
- 1 can of flat black spray paint. I got Painter’s Touch, which was labeled “primer + paint” for less than $4.
- 2 bungee cords, approximately 18″ long unstretched. We had these laying around from a Harbor Freight assortment kit we got a while back. They’re probably about $1 each, and are use to secure both the organizer to the floor, and secure bags in the two outer bins.
- 4 3/4″ felt pads. These are really optional, but might help prevent damage to the interior of the car. We had them on had, but you can also pick them up at the home center for a couple dollars.
Directions:
- From each 5-foot length, cut one 41″ board, and one 17″ board.
- On both 17″ boards, measure in 1 3/4″ from each end and cut a 3/4″ slot across half the width of the board. Cut both boards together.
- On both 41″ boards, measure 13″ from each end and cut a 3/4″ slot across half the width of the board. Cut both boards together.
- Also on both 41″ boards, measure about 2 1/2″ from each end and drill a 1/2″ hole so it overlaps the edge of the board enough to fit a bungee cord. Do this on the opposite side from the slots if you want the 41″ boards to hold down the 17″ boards, or on the same side to make the weak ends of the 17″ boards a little more protected from accidental breaks.
- Sand, assemble, and paint.
- Attach a felt pad to the middle of the end of each 41″ board, and install into car. Run the bungee from the back hook, through the drill holes, and up to the front hook. You can tie a knot in the bungee where it passes through the board to help keep it in place if it slides.

It’s important to note that the small sections of 17″ board on the outside of the 41″ boards will be weak because there’s only 2.5″ against the grain holding them in place. If you’re going to be disassembling/reassembling this a lot, you might want to glue some blocks to those weak areas to strengthen them.
Hello,
I can’t find any contact info in the site so forgive me for using the comment section. I’m Algen, I work with engineering website EEWeb.com and would love to do an exchange of website links (with your website: http://www.thefrankes.com/) and feature you as a site of the day on EEWeb (you can see an example here http://www.eeweb.com/websites/sparkle-labs/). Is this of interest to you?
Hope to hear from you soon.
Sincerely,
Algen Dela Cruz
EEweb.com
algen@eeweb.com