
This is Part 2 of the BookNook Light Timer Series.
Last time I introduced my BookNook Light Timer project and walked through how I planned to complete it using an ATtiny85 microcontroller. In this post, I wanted to unpack the firmware driving the device… how it uses minimal power, responds to touch, keeps time over long intervals, and avoids some common low-power traps.
The goals for the firmware were clear but non-trivial:
- The LED should turn on with a touch and auto-turn off after a configurable duration.
- The chip should spend almost all its life in the lowest-power sleep mode possible.
- No polling loops or busy waits — rely on interrupts cleanly.
- Use only hardware the ATtiny85 provides, without external RTCs or expensive crystals.
Now let’s walk through the current final code and the engineering decisions behind it. You can find complete project resources, including this source file, over on GitHub here: https://github.com/alexfranke/booknook-light-timer
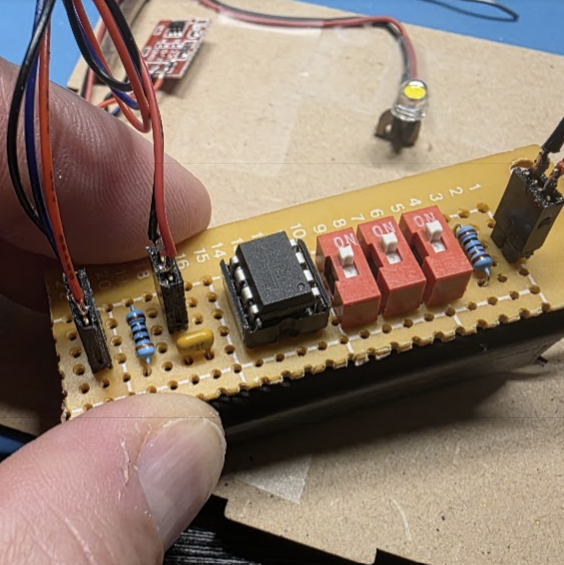
Overview of the Code Structure
Everything is in main.cpp, which implements:
- Interrupt-driven touch detection
- Watchdog-based coarse timer
- Deep power-down sleep mode
- Configurable run time DIP switches
Here’s how and why each part works.
Pin Definitions and Constants
const uint8_t DIP_MSB_PIN   = 4;  // PB4, Pin 3
const uint8_t DIP_LSB_PIN   = 2;  // PB2, Pin 7
const uint8_t DIP_HOUR_PIN  = 3;  // PB3, Pin 2 (active LOW for hours mode, HIGH for minutes mode)

const uint8_t TOUCH_PIN     = 1;  // PB1 - Touch signal input
const uint8_t LED_PIN       = 0;  // PB0 - LED signal output (LOW = ON)
Each ATtiny85 pin is carefully assigned a purpose. Using named constants instead of hard-coded numbers improves readability, keeps it more maintainable, and reduces bugs down the road. By defining F_CPU at the top for a 1 MHz clock, timing functions such as _delay_us() behave correctly. Running at 1 MHz is a deliberate choice to keep power consumption down without sacrificing functionality… I just need to remember this when writing the firmware to the chip.
I tweaked the pin assignments a little bit from the original version to make the PCB layout a bit cleaner. I’m using a PCI (pin change interrupt) as opposed to the external interrupt, so I’m not confined to Pin 2 for the touch signal used to wake.
Setup Is Lean and Mean
The setup() function attempts to turn of every feature we don’t need so we can really get down to microamp level sleep. The ADC caused me a headache at first because I was originally only killing its power and not its clock, so every time I tested it, the chip was drawing 250-300 µA. That’s not a lot, but it’s way more than chip specs indicate for shut-down level sleep. Once I figured out that little detail, sleep current dropped to about 4 µA — basically sipping electrons so slowly that the batteries will discharge naturally before being depleted by the microcontroller.
  ADCSRA &= ~(1 << ADEN);   // manually kill ADC
  power_adc_disable();      // disable ADC clock
  ACSR |= (1 << ACD);       // disable analog comparator
  power_timer0_disable();   // Cut power to timer0
  power_timer1_disable();   // Cut power to timer1
I also disabled both timers here. I avoided millis() earlier so I could do this.
Timekeeping with the Watchdog Timer
The firmware uses the AVR watchdog timer (WDT) for timing in lieu of Timer0 or Timer1, both of which would draw hundreds of microamps if left running. The WDT’s maximum wake interval of 8 seconds is plenty granular enough for this project because I’m using it to measure intervals in the many minutes to hours range.
volatile uint32_t sleepCounter = 0;
const uint8_t SLEEP_SECONDS = 8;
Every WDT wake adds a fixed increment to sleepCounter. This counter accumulates the elapsed time in real seconds based on the watchdog’s ~8 second cycle length. Because the watchdog fires periodically even while the MCU is in deep sleep, it’s a great fit for long-duration timing without keeping any peripherals awake.
The ISR (interrupt service routine) is simple and fast because all I need to do here is update the elapsed time. This keeps the the interrupt processing pretty clean.
ISR(WDT_vect) {
  sleepCounter += SLEEP_SECONDS;
}
Touch Detection via Pin Change Interrupt
ISR(PCINT0_vect) {

  bool pinHigh = PINB & (1 << TOUCH_PIN);

  // A touchEvent is only triggered on the transition from LOW to HIGH -- this prevents
  // multiple triggers from a single touch and allows us to ignore noise when the pin is
  // idle (HIGH) and only respond to actual touches (LOW -> HIGH)
  static bool touchActive = false;
  if (pinHigh && !touchActive) {
    // IDLE -> ACTIVE transition
    touchActive = true;
    touchEvent = true;
  }
  else if (!pinHigh && touchActive) {
    // ACTIVE -> IDLE transition
    touchActive = false;
  }
}
This ISR for the pin change is a little heavier, but not too bad. It detects a rising edge on the touch input, which is exactly what we want right now — a single event when a touch is detected. A lot of touch hardware either pulses HIGH momentarily or latches in a HIGH state, and edge detection abstracts both behaviors without altering the hardware wiring. The use of a static local previousState instead of a global variable keeps the ISR concise and encapsulated.
In the future I’ll probably look to rework this so that the user can override the default time with double, triple or quadruple clicks — that seems like it would be a nice feature to have. Or maybe even allow the user to hold the button down to set the time… after one second hold the led flashes once to indicate 1 hour, after two seconds, two flashes for two hours, etc.
Deep Sleep Implementation
void sleep() {
  set_sleep_mode(SLEEP_MODE_PWR_DOWN);  // Deepest sleep mode
  sleep_enable(); // Arm sleep
  cli();  // Disable interrupts
  sleep_bod_disable(); // disabled in fuses, but just in case
  sei();  // Re-enable interrupts
  sleep_cpu();  // Go to sleep

  //...sleeping...

  sleep_disable(); // Just woke up
}
Along with the setup configuration, the sleep() function is the heart of the low-power strategy. The ATtiny85’s deepest sleep mode (SLEEP_MODE_PWR_DOWN) shuts off almost everything except what is needed to waken on interrupt. The Brown-Out Detector is manually turned off here, too , just in case I forget to disable it with the fuse bits. This should close every possible source of unwanted current drain.
The cli()/sei() pair ensures sleep enable and BOD disable happen atomically — this is a detail I missed at first, but it’s critical for achieving µA-class sleep. I discovered the error in testing by checking the current draw in circuit… I originally wasn’t hitting that microamp target until I got this sequence nailed down.
Reading DIP Switches Efficiently
void readDIP() {

  // Read DIP switches -- only need to do this when turning ON
  DIDR0 &= ~((1 << ADC3D) | (1 << ADC2D)); // activate input buffers
  pinMode(DIP_MSB_PIN, INPUT_PULLUP);
  pinMode(DIP_LSB_PIN, INPUT_PULLUP);
  pinMode(DIP_HOUR_PIN, INPUT_PULLUP); // production mode by default
  _delay_us(50); // stabilize pins

  // Invert active low switches and combine into a single value
  uint8_t bit0 = !digitalRead(DIP_LSB_PIN);
  uint8_t bit1 = !digitalRead(DIP_MSB_PIN);
  uint8_t value = (bit1 << 1) | bit0;

  // LOW (switch ON) = hours mode, HIGH/OFF = minutes mode
  bool hoursMode = !digitalRead(DIP_HOUR_PIN);

  // Shut them back down immediately - disable pullups, input buffers, and set to High-Z
  // to save power since we only need to read them once when the LED turns on.
  PORTB &= ~((1 << DIP_LSB_PIN) | (1 << DIP_MSB_PIN) | (1 << DIP_HOUR_PIN) );  // disable pull-ups
  DIDR0 |= (1 << ADC3D) | (1 << ADC2D); // disable input buffers
  pinMode(DIP_LSB_PIN, INPUT);          // back to High-Z
  pinMode(DIP_MSB_PIN, INPUT);
  pinMode(DIP_HOUR_PIN, INPUT);

  // Convert DIP value to cycles: 0b00=1, 0b01=2, 0b10=4, 0b11=8
  /// ...and then to seconds based on DEBUG mode
  uint8_t units = 1 << value;

  if (hoursMode) {
    maxSleepSeconds = units * 3600UL; // 1 hour per unit (1, 2, 4, 8 hours)
  }
  else {
    // Directly use minutes instead of hours. These will be rounded up to the
    // nearest 8s in the main loop due to the WDT granularity.
    maxSleepSeconds = units * 120UL;  // 2 min per unit (2, 4, 8, 16 mins)
  }
}
The DIP switches define the length of time that the LED should remain on by default (with a single tap). I originally had one pin set up to define a “debug mode” that used 5-second increments instead of hours, which is really handy for testing, but I changed this to be a bit more practical, so now it switches between minutes and hours mode.
But the overall strategy here is to leave everything turned off until user interaction is sensed, and then only turn on features of the chip long enough to do the work I need to do before turning them right back off again. So when this method is called — which is only when the user presses the button — I enable the input buffers and pull-ups, wait for the pin voltage to settle in, read the values, and then immediately shut everything back down again. Every microamp counts and this makes a pretty big difference.
I’m using _delay_us() here because it does NOT require an active timer like the Arduino millis() method does. Combining this with #define F_CPU 1000000UL at the top (before the includes) ensures its accuracy.
Originally I had the boolean logic reversed because the switches are active LOW — the ON position of the DIP switch means that the pin is pulled to GND, so it will read 0, and likewise the OFF position will read 1. I invert the DIP switch values as a result and shift their positions into a variable to get a nice power-of-two range of delay times.
The Main Control Loop
void loop() {
  // Check for touch to toggle LED
  if (touchEvent) {
    touchEvent = false;
    ledOn = !ledOn;

    if (ledOn) {

      // Canculate LED ON time based on DIP switches
      readDIP();

      // Start the Watchdog timer -- this only needs to be running when the LED is ON
      // ALso reset sleep counter and turn on LED
      sleepCounter = 0;
      MCUSR &= ~(1 << WDRF);
      WDTCR |= (1 << WDCE) | (1 << WDE);
      WDTCR = (1 << WDIE) | (1 << WDP3) | (1 << WDP0);

      // actually turn on LED
      digitalWrite(LED_PIN, LOW); // LOW to turn on since we're doing low-side switching

    } else {
      // User manually toggled OFF, so shut down WDT and turn off LED
      digitalWrite(LED_PIN, HIGH); // HIGH to turn off since we're doing low-side switching
      wdt_disable();
    }
  }

  sleep();  // go to sleep

  if ( ledOn ) {
    uint32_t counterCopy;
    ATOMIC_BLOCK(ATOMIC_RESTORESTATE) {
      counterCopy = sleepCounter;
    }

    if (counterCopy >= maxSleepSeconds) {
      ledOn = false;
      digitalWrite(LED_PIN, HIGH); // HIGH to turn off since we're doing low-side switching
      wdt_disable(); // fully disable WDT to save power while LEDis off
    }
    else {
      // Re-enable WDT interrupt for the next 8s cycle -- necessary because the WDT
      // interrupt bit often clears itself
      WDTCR |= (1 << WDCE) | (1 << WDIE);
    }
  }
The main control loop sticks to its job of starting and stopping the WDT and controlling the LED. Basically, the watchdog timer only needs to be running with the LED is on, and the LED only gets turned on when the user touches the button (triggering the interrupt)… no need for the timer at all when the LED is off because we don’t need to keep track of that time.
Because we’re spending most of the time in deep sleep, I find it easier to read this code from the middle, starting where sleep() is called. We come out of this method when either the watchdog timer ticks or the user presses a button (touchEvent will be true in this case). When we come out of sleep, if the LED is on we just need to check and see if we’ve been asleep long enough. (The ATOMIC_BLOCK ensures we read the multi-byte watchdog counter safely even if an interrupt fires mid-read.) If we have been asleep long enough, then we can turn off the LED and shut down the watchdog timer.
Then we go back to the beginning of the loop (because it’s a loop) and handle the touchEvent. If the touchEvent means that the LED is supposed to turn on, then check the DIP switches to get the sleep time, start the watchdog timer, reset the sleep time, and turn on the LED. If it’s not supposed to come on, then the user tapped again to turn it off, and if that’s the case we can turn off the watchdog timer to save energy and turn off the LED.
One interesting quirk worth discussing is the WDTCR |= (1 << WDIE) after waking: Due to a subtle AVR hardware behavior, the watchdog interrupt enable bit can clear itself on wake, so I’m just setting it again here just in case.
What’s Next
Next I’ll talk a bit more about circuit design — including decisions like active low and driving the LED, so stay tuned!
hmm.