This all-team email went out three days before the third club meeting. In this case, the older club members (and most of the primary leads) were going to be on an out-of-town field trip, causing them to miss the meeting.
Hello 3D Printer Club Members!
The 5th graders will be on a field trip on Friday, so we will meet in [new location] this week. Many of you have been hard at work toward our common goal. By Friday, I believe we’ll have parts lists for almost all of the major subassemblies of the printer, a membership list with privacy information, a general accounting ledger, and even some great progress on the blog front. We’ve even gotten a couple of parts in the mail already!
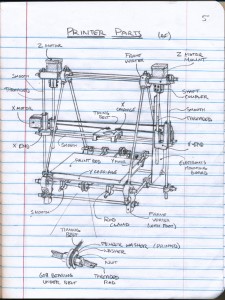
Meantime, I wanted to share with you a diagram I made that illustrates many of the parts of the printer we will build. Please review it (or even print it out, if possible) so that you can familiarize yourself with the various parts of the machine — if any of your friends ask what you’re building, you can tell them it’s a “Cartesian robot.” It’s “Cartesian” because it has an X, Y, and Z axis, and this coordinate system was invented by a smart man named René Descartes in the 1600’s. It’s a “robot” because it’s a mechanical machine that’s guided by electronic circuitry and a computer.
You’ll learn more about these parts as we move along.
(The label at the top says “Z motor,” not “2 motor” — my Z looks way too much like a 2 in this drawing!)


sir..!!! thanks fa ur diagram..!! nd i wanna create miniature 3d printer,, i jus wanna know abt the print head working, various nozzles in print head and what all material we can use for both part material and support material..
Hi
Do you have a partlist or plan to build this machine from scratch which I can buy from you?