DIY Drum Sander
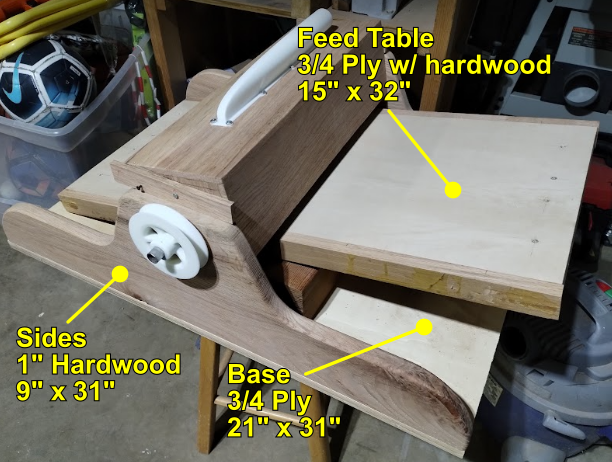

Backstory: We took down a red oak a couple years ago (Part 1 and Part 2) and I got it milled up for projects. Wifey wants a desk but the grain is a little tricky and my thickness planer just…
Backstory: We took down a red oak a couple years ago (Part 1 and Part 2) and I got it milled up for projects. Wifey wants a desk but the grain is a little tricky and my thickness planer just…
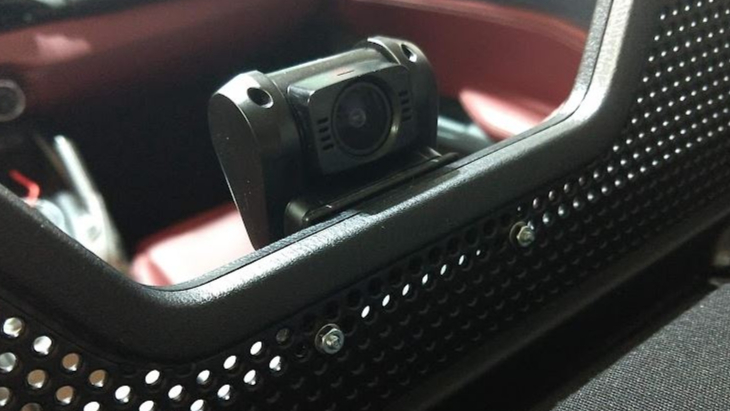
I got the Viofo A129 Duo a couple years ago because I seem to keep getting cut off in my little Mazda MX-5 Miata ND (2016+). It’s a ragtop convertible with only one obvious place to mount a rear-facing camera,…
Get comfortable using basic tools Safety first. Each disassembly should be supervised. There are sharp and springy parts, so take proper safety precautions. Adults should NOT let the kids make safety mistakes. Always use the proper tool. For example, don’t…
[sc:3dclub-intro] Here’s a quick update on some of the projects we’ve been working on this year:
Here’s the complete Bill of Materials (BOM) for the club’s Prusa i2 build. It’s sorted first by type of material, then by assembly. The number at the left is the part number in the order it was recorded from a…
[sc:3dclub-intro] Here’s a certificate of achievement that you can use for the kids who complete the project at your school. We had two titles: The kids who were in the club were awarded “3D Printer Maker” certificates, and those that…
In this video, Jacob shows an easy way to set up a PCB heatbed for your 3D printer — a method that allows the entire surface of the heatbed to be used for printing. He also shows how to cut…
[sc:3dclub-intro] Here’s a video to the team from software developer and RepRap expert Alessandro Ranellucci, the creator of the extremely popular Slic3r software.
Random wires are ugly, so we decided to ask for some spare spiral binding coil at the local office supply store and walked away with a handful of 6mm and 10mm coils. They make for very nice wire wrap.
We made a video to show the difference in noise between the Pololu A4988 Stepper Motor Driver Carrier, which has 1/16 steps, and the DRV8825 Stepper Motor Driver Carrier which has 1/32 steps. These drivers are common in RepRap 3D…