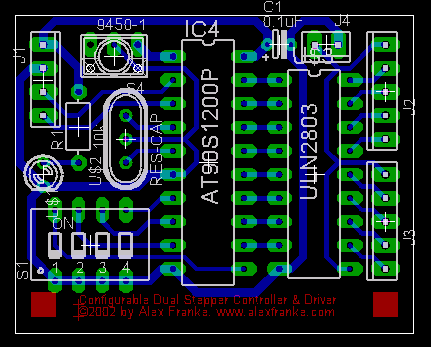
| An even tinier 4-amp dual stepper motor controller and driver, providing 500mA per phase for two 4-phase unipolar steppers, or 1A per phase for 1 motor when signals are combined (separate input for motor power). Four-position DIP switches assign a unique device number for addressing within the network, and various motor commands received via the 4-pin interface (+5V, GND, SCL, SDA) are translated and clocked out by the onboard microprocessor, completely freeing the controlling device of this tedious task. Quite small — less than 1.75″ x 1.5″ including mounting area. I should say that there’s another version of this as a low-end PIC application (PIC12C505, and alternatively the 8-pin 12C508). The 14-pin version takes a 6-pin input, with power, ground and direction & step bits for each motor. This offers the user very simple motor control with just a few pins and the PIC just acts as a translator. Then I got the itch make it smaller. The 8-pin version takes a cable with +5V, GND, Device, Direction and Step, leaving only three pins for all the dirty work. I used a 74LS595 shift register with latch to maintain the motor states. The PIC waits to receive commands for both motors then updates the motor phases. (e.g. Sending pins 3-5 a “011” followed by a “101” will set motor 0 to step one phase forward, and motor 1 will step one phase back. Note that the last bit may be 0, meaning no step will be taken.) The microcontroller then goes into low power sleep while the shift register holds the motor. I ended up wanting a bit more flexibility with an I2C interface. But, since a 4MHz PIC runs at only 1 MIPS (It uses four clocks per instruction cycle.), it’s a little difficult to implement even the “slow” I2C mode at 100kbps. I do want to go back and see if this is doable by continually forcing the master into wait states. Regardless, it turned out to be more trouble than it was worth — especially if I could get an AVR micro for a fraction of the cost, use it to replace the shift register (it’s only 4 pins larger), and crank out 12 MIPS. This gave me room on the board for the DIP switches and even a flashing LED! Anyway, the PCB is no-frills and still needs some work. P.S. If you were wondering why, in paragraph 2, I felt the “Device” pin was necessary when the controller waits for two commands anyway, it’s because the user doesn’t have to send both commands. The PIC will time out waiting for the second command and simply update the motor state as appropriate. So then why is the “Step” pin necessary?? Now THAT’s a good question! |